Purpose:
This guide will demonstrate the simplified process of exposing services in your on-premises Kubernetes cluster using an Ingress Controller & MetalLB.
Prerequisites:
- Ensure the on-premises Kubernetes cluster is up and running.
- kubectl is configured to communicate with your Kubernetes cluster.
- Basic understanding of Kubernetes concepts like Pods, Services, and Ingress.
- To expose services to the outside world, you must map your public IP to the domain name we will use for host-based ingress rules. For example, we mapped jenkins.example.com to our static public IP under a subdomain in our domain providers portal.
- IPAddressPool specifies the range of IP addresses the metal lb load balancer can use. (IP address range in your local network)
Components:
- MetalLB
- Nginx Ingress Controller
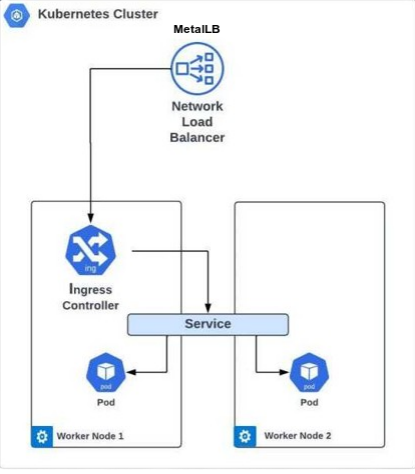
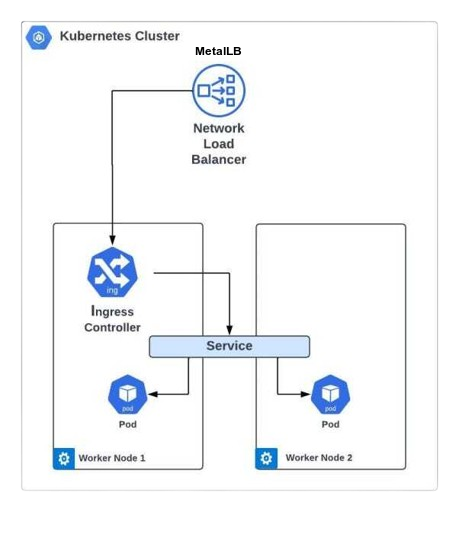
Architecture:
Instructions:
Install MetalLB
MetalLB is crucial in deploying a Kubernetes service of type LoadBalancer, seamlessly handling incoming traffic by utilizing an IP address pool configured earlier.
To initiate the process, let’s install MetalLB using the manifests approach. Follow the detailed instructions provided in the documentation available at https://metallb.universe.tf/installation/.
Once MetalLB is installed, let’s delve into the analysis of the pods. You’ll notice two distinct types of pods emerging post-application of the provided manifests: the controller and the speaker. Ensure that all pods are running, to check that use the following command.
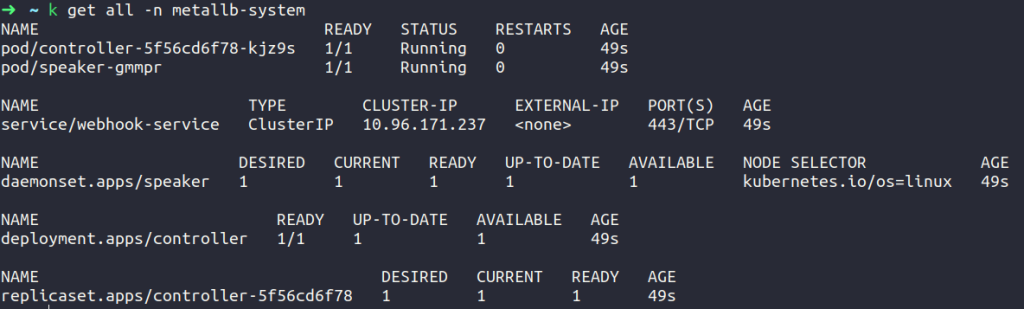
In MetalLB’s ecosystem, the controller acts as the overarching authority, responsible for assigning IPs throughout the cluster. On the other hand, the speaker, implemented as a daemon set, is distributed across every node in your cluster. Its role is to broadcast services alongside their assigned IPs using various advertising techniques.
The setup for MetalLB lacks a configuration file in its installation manifest. Although MetalLB’s components will initialize, they’ll remain inactive until you deploy resources. To start the process, you need to define an IP address pool. This pool specifies a range of IP addresses dedicated to the load balancer. Assigning the same range as your worker node’s frontend network for seamless integration is advisable.
Note: – IP address allocation
MetalLB assigns IPs to services based on instructions provided in an IPAddressPool Custom Resource (CR). These IPs, allocated via IPAddressPools, form the pool from which MetalLB assigns IPs to services. You can define multiple IPAddressPools concurrently, using CIDR notation or ranges, supporting both IPv4 and IPv6 addresses. After IPs are assigned to a service, they need to be announced, a task accomplished through Layer2 Configuration.
apiVersion: metallb.io/v1beta1
kind: IPAddressPool
metadata:
     name: first-pool
     namespace: metallb-system
spec:
      addresses:
      # use the same IP range as your worker node's frontend network use.
      -172.21.0.10-172.21.0.20
    ------------
apiVersion: metallb.io/v1beta1
kind: L2Advertisement
metadata:
      name: example
      namespace: metallb-system
 spec:
       ipAddressPools:
       - first-pool
Using this approach, MetalLB assigns IP addresses to services that utilize the LoadBalancer type. Use the following command to check that the range of IP addresses we give is taken appropriately by first-pool.

Working of MetalLB
MetalLB allocates IP addresses to services within a Kubernetes On-Premise cluster, ensuring there are no conflicts with existing network addresses, thereby enabling smooth operation and assignment of IP addresses for Kubernetes services.
Install Nginx Ingress Controller
Moving forward, the next step involves installing an Ingress controller. With various options available such as NGINX Ingress Controller, Traefik, HAProxy Ingress, Contour, Kong, and Gloo, we have chosen to install the NGINX Ingress Controller using manifests. The installation process follows the documentation provided for the NGINX Ingress Controller. https://docs.nginx.com/nginx-ingress-controller/installation/installing-nic/installation-with-manifests/
To set up the NGINX Ingress Controller on Kubernetes, we will perform the following steps:
- Create a namespace and a service account.
- Configuration of a cluster role and binding for the service account.
- Create a ConfigMap to customize your NGINX settings.
- Create an IngressClass resource. NGINX Ingress Controller won’t start without an IngressClass resource.
- Deploy CRDs for VirtualServer and VirtualServerRoute, TransportServer, Policy, and GlobalConfiguration.
- Deploy NGINX Ingress Controller.
- Create a LoadBalancer service.
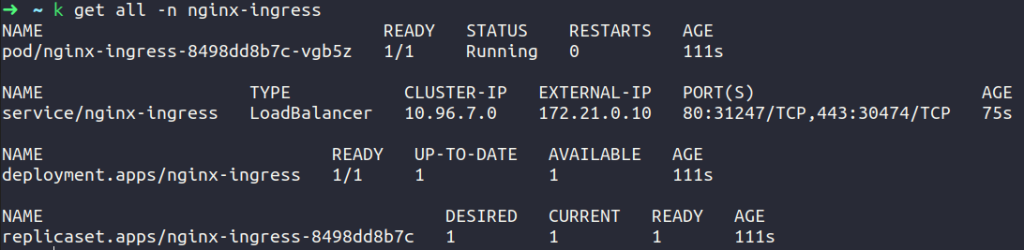
The external-ip for our Nginx Ingress Controller is 172.21.0.10 which is given by MetalLB.
Working of NGINX Ingress Controller
The NGINX Ingress Controller dynamically configures NGINX based on Ingress Resources to manage incoming traffic to Kubernetes applications.
Exposing Jenkins On Kubernetes On-Premise Cluster
After installing the Ingress Controller, the subsequent step involves deploying Jenkins on the Kubernetes On-Premise cluster. A simplified guide to installing Jenkins is as follows:
Setup Jenkins on Kubernetes:
- Create a Namespace
- Create a service account with Kubernetes admin permissions.
- Establish a local persistent volume to maintain Jenkins data consistently across pod restarts.
- Deploy Jenkins using a deployment YAML file.
- Deploy the service for Jenkins using a service YAML file.
When deploying Jenkins on Kubernetes, ensure to modify the service type from NodePort to ClusterIP in the provided sample service.yaml. This modification is necessary to facilitate access via the Ingress Controller.
apiVersion: v1
kind: Service
metadata:
      name: jenkins-service
      namespace: devops-tools
      annotations:
                prometheus.io/scrape:   'true'
                prometheus.io/path:     /
                prometheus.io/port:       '8080'
spec:
     selector:
          app:  jenkins-server
      #  type:  NodePort
           type:  ClusterIP
           ports: -
                   port: 8080
                   targetPort: 8080
              #   nodePort: 32000
Setting up an Ingress rule for the Jenkins service
To enable access to Jenkins via the URL “jenkins.example.com,” we need to create an Ingress rule. This rule will direct incoming traffic to the Jenkins service hosted within your Kubernetes cluster.
Additionally, we need to configure Port Mapping rules on the router for the IP used by the NGINX Ingress Controller for ports 80 and 443. Suppose, MetalLB assigns the IP address 172.21.0.10 to the NGINX Ingress Controller, ports 80 and 443 must be opened for this IP address.
After configuring port mapping rules, the subsequent step is to create an ingress rule for the Jenkins service to facilitate access to our Jenkins instance.
apiVersion: networking.k8s.io/v1
kind: Ingress
metadata:
       name: jenkins-ingress
       namespace: devops-tools
spec:
     rules:
      - host:  jenkins.example.com
         http:
              paths:
                 -  path:   /
                     pathType:  Prefix
                     backend:
                          service:
                               name:   jenkins-service
                               port:
                                     number:  8080
In this way, we’ve successfully deployed the Jenkins service for access within the Kubernetes On-Premise cluster. As mentioned, Jenkins can also be accessed via NodePort to verify proper functionality. Now moving forward to access the Jenkins service through URL (e.g., jenkins.example.com) on both ports 80 and 443, i.e., for HTTP and HTTPS respectively. To achieve this, ensure that DNS is appropriately mapped for jenkins.example.com, curl the domain name on which you want to access Jenkins using the following:
curl -v jenkins.example.com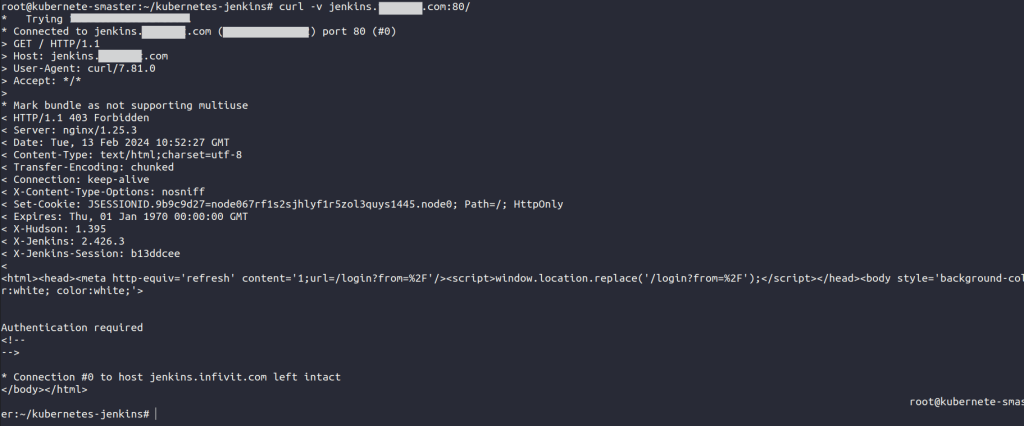
In this manner, we utilize the curl command-line tool to access the Jenkins login page via their designated domain name.
Conclusion
Following these steps, we have successfully simplified service exposure in your on-premises Kubernetes cluster by implementing an Ingress Controller. This methodology offers a centralized and efficient approach to managing external access to your services.