In the fast-moving world of software development, continuous integration and continuous delivery (CI/CD) have become essential for delivering quality features at speed. At Infivit, we recently streamlined CI/CD pipeline for one of our client by integrating GitHub Actions with Argo CD Image Updater, resulting in a significant boost in deployment automation, developer velocity, and operational efficiency.
In this blog, we’ll walk through how this setup works—and more importantly, how it helps save time, reduce manual effort, and accelerate feature delivery.
🔧 Why We Chose This Stack
GitHub Actions for CI
GitHub Actions allows us to run CI workflows directly from our repositories. With every code push:
- Test cases are run
- Code is linted
- Docker images are built and pushed to GHCR
Argo CD for CD
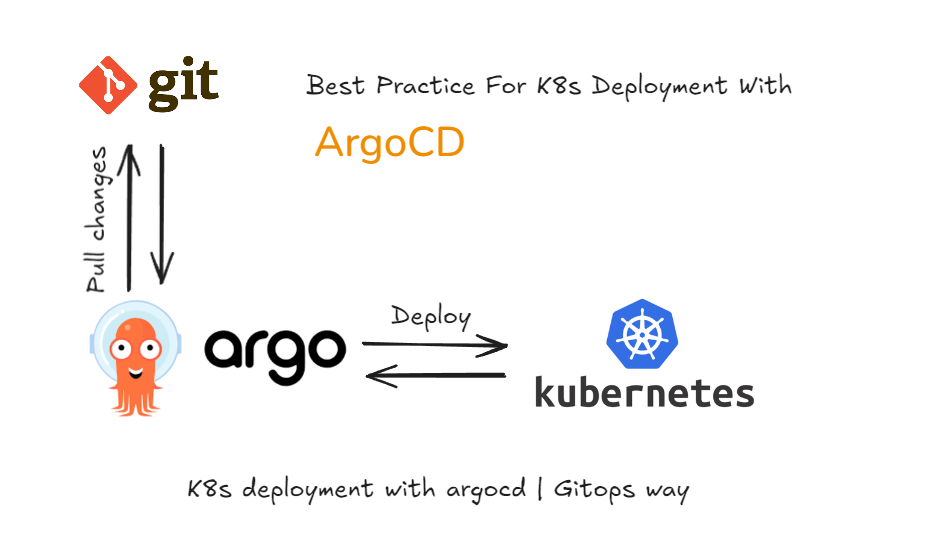
Argo CD continuously syncs Kubernetes clusters with our Git repositories. It uses a GitOps model to ensure our clusters always reflect the state defined in Git.
Argo CD Image Updater: The Missing Link
This tool automatically monitors image registries and updates Kubernetes manifests in Git when new image tags are available—removing the need for manual version bumps in YAML files.
⚙️ Our CI/CD Pipeline at a Glance
A[Developer pushes code to GitHub] --> B[GitHub Actions triggered]
B --> C[Docker image built]
C --> D[Image pushed to GHCR]
D --> E[Argo CD Image Updater detects new tag]
E --> F[Deployment YAML updated in Git]
F --> G[Argo CD syncs cluster]
G --> H[Application updated in Kubernetes]
🛠️ Step-by-Step Setup
Now that we’ve seen how the flow works, let’s walk through the step-by-step setup of the CI/CD pipeline using GitHub Actions, Argo CD, and Argo CD Image Updater.
🐳 1. Install Docker
Download from: https://www.docker.com/products/docker-desktop🐙 2. GitHub Repository Setup
Create a GitHub repo to store:
Application code (e.g., Node.js app)
Kubernetes manifests (deployment.yaml,service.yaml)
GitHub Actions workflow (.github/workflows/deploy.yml)
☸️ 3. Install & Configure Kubernetes Cluster
https://kubernetes.io/docs/tasks/tools/install-kubectl-linux/🚀 4. Install Argo CD
https://argo-cd.readthedocs.io/en/stable/operator-manual/installation/#installation🔐 5. Install Argo CD Image Updater
https://argocd-image-updater.readthedocs.io/en/stable/install/installation/- Configure Git access (if using
write-back-method: git) - Optionally configure image registry credentials via Kubernetes secrets.
📦 6. Configure GitHub Actions
Add .github/workflows/deploy.yml
Set up GitHub Secrets:
GHCR_TOKEN, DOCKER_USERNAME, etc
🧩 Step-by-Step Implementation
1. Set Up GitHub Actions (CI)
Create .github/workflows/deploy.yml:
name: CI Pipeline

on:

 push:
    branches: [ main ]

jobs:

   build:
       runs-on: ubuntu-latest
       steps:
       -  name: Checkout code
          uses: actions/checkout@v3

    - name: Log in to GHCR
      run: echo "${{ secrets.GITHUB_TOKEN }}" | docker login ghcr.io -u ${{ github.actor }} --password-stdin

    - name: Build and push Docker image
      run: |
        docker build -t ghcr.io/your_username/your-app:${{ github.sha }} .
        docker push ghcr.io/your_username/your-app:${{ github.sha }}
2. Configure Argo CD Application
Your application.yaml might look like:
apiVersion: argoproj.io/v1alpha1
kind: Application
metadata:
  name: my-app
spec:
  source:
    repoURL: https://github.com/your_username/your-repo
    targetRevision: HEAD
  destination:
    server: https://kubernetes.default.svc
    namespace: default
  syncPolicy:
    automated:
      prune: true
3. Creating an Argo CD Application through GUI
Step-by-Step Guide
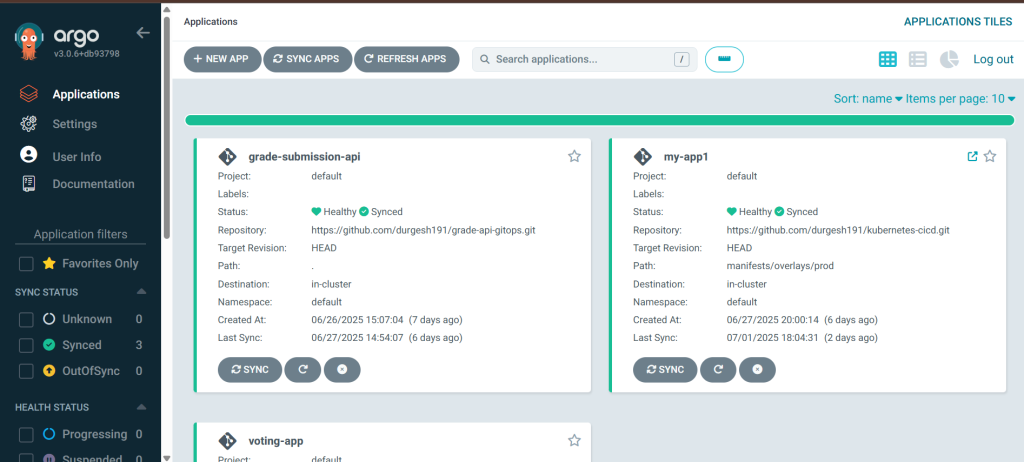
1. 🔐 Log in to the Argo CD Dashboard
- Login with your Argo CD admin credentials.

2. ➕ Click on “NEW APP”
- On the top-right corner, click the “+ NEW APP” button to create a new application.

3. 📝 Fill Out Application Info
| Field | Description |
| Application Name | Name of your app, e.g., grade-submission-api |
| Project | Leave as default (or select your project) |
| Sync Policy | Choose automatic or manual (you can enable self-heal/prune later) |
4. 📁 Define Source Repository
| Field | Example |
| Repository URL | https://github.com/your_username/your-repo.git |
| Revision | HEAD or a branch name (e.g., main) |
| Path | . or path to your Kubernetes manifests (e.g., manifests/) |
5. ☸️ Configure the Destination
| Field | Value |
| Cluster URL | https://kubernetes.default.svc (for in-cluster) |
| Namespace | e.g., default or production |
6. ✅ Create and Sync
- Click “Create” to finish.
- Once created, click “SYNC” to deploy the app to your Kubernetes cluster.
- You’ll see real-time status like Synced, Healthy, OutOfSync, etc
4. 🔄 Configure Argo CD Image Updater
Add these annotations to your deployment YAML:
metadata:

 annotations:

   argocd-image-updater.argoproj.io/image-list: ghcr.io/your_username/your-app

   argocd-image-updater.argoproj.io/write-back-method: git

   argocd-image-updater.argoproj.io/your_username_your-app.update-strategy: latest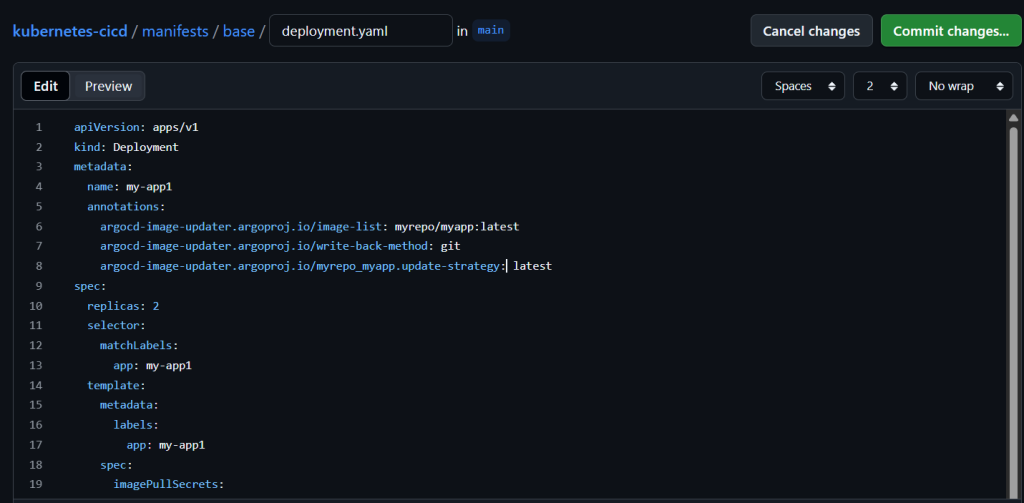
✅ Now, Image Updater will:
- Detect a new image pushed to
- Commit a change to your deployment YAML with the new image tag
- Argo CD auto-syncs and deploys it to your cluster

✅ Final Result
- Dev pushes code to GitHub
- GitHub Actions builds & pushes a Docker image
- Argo CD Image Updater detects the new image
- Updates deployment manifest in Git
- Argo CD syncs and deploys it to Kubernetes
- Your app is automatically updated!