
🛡 What is Guardsquare?
Guardsquare is a security-focused company best known for tools like ProGuard, DexGuard, and AppSweep. These tools help Android/iOS developers obfuscate, optimize, and secure their apps against various forms of reverse engineering and runtime threats.
✳ Core Products:
- ProGuard: Open-source Java class file shrinker, optimizer, obfuscator, and preverifier.
- DexGuard (Commercial): An enhanced version of ProGuard, specifically designed for Android, with advanced obfuscation and encryption features.
- AppSweep (Free): Static analysis tool that scans your app for security issues and best practices.
- iXGuard: For iOS apps—applies similar protections as DexGuard but for Swift/Obj-C.
⚙️ Why Use Guardsquare?
- Prevent Reverse Engineering: Obfuscation renames classes, methods, and fields making the code hard to read.
- Reduce Size: Code shrinking removes unused code.
- Improve Performance: Optimization can enhance execution.
- Detect & Mitigate Runtime Attacks: DexGuard adds tamper detection, root detection, emulator checks, etc.
- Shift Left Security: AppSweep enables early static analysis during CI/CD.
🔗 Integrating Guardsquare Tools into Android/iOS Projects
1. List Applications On GuardSquare
Lists your applications, grouped per operating system. When clicking an application, you will get redirected to the app overview page, which has the following cards:
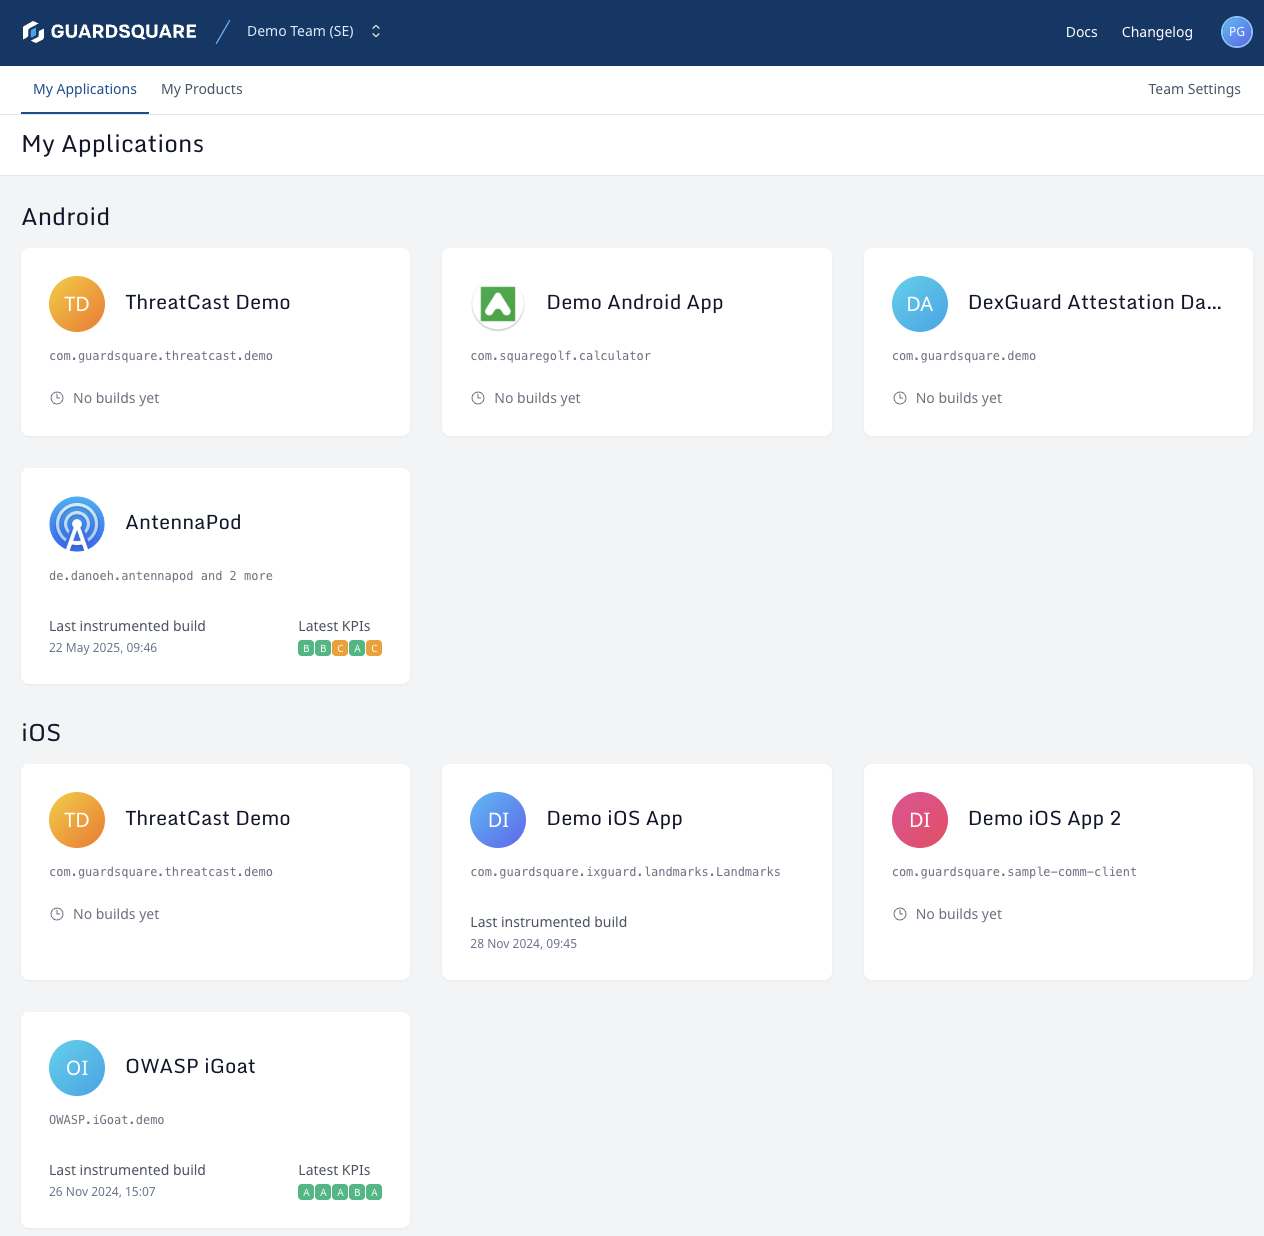
- Guardsquare Guided Configuration Workflow : This new workflow is aimed at simplifying the process of generating a protected build of your Android or iOS application
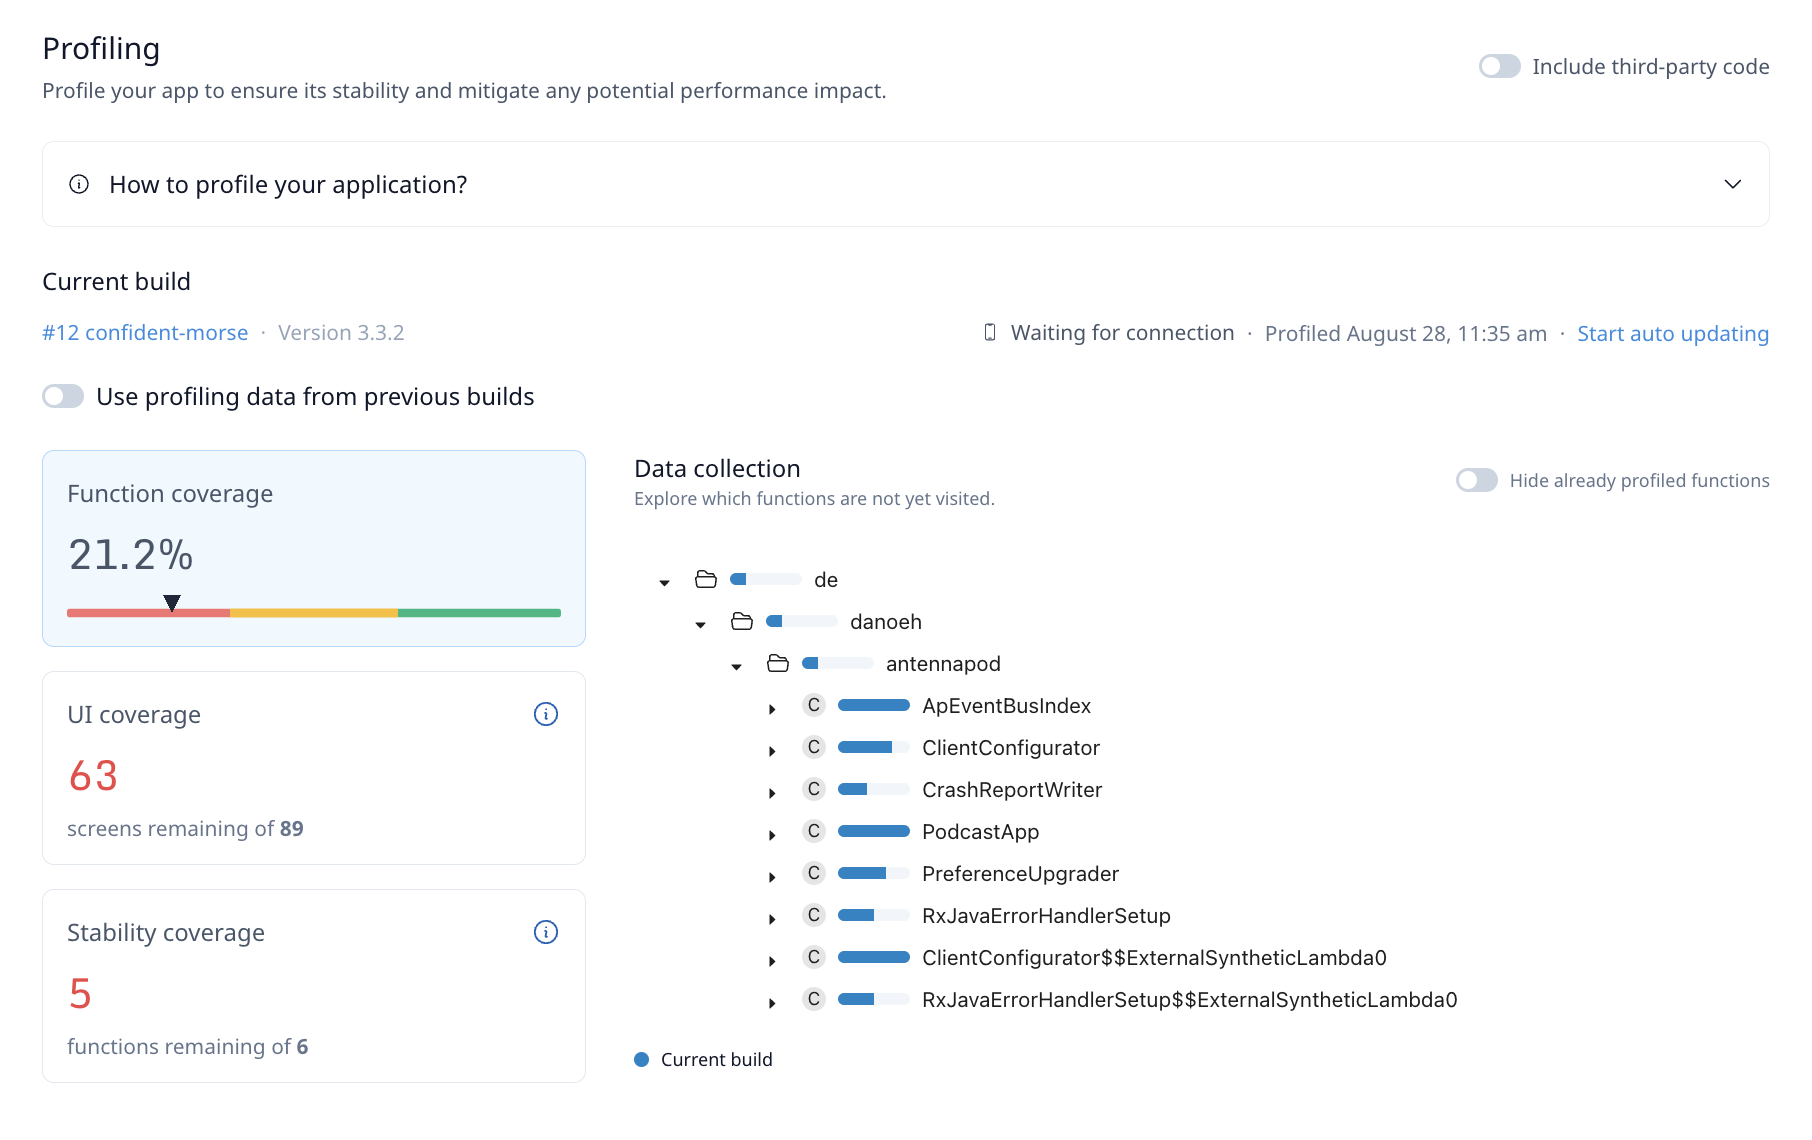
- App Profiling: Install and execute a guardsquare instrumented version of your application in order to capture your application behaviour. The goal here is to trigger as much of your app’s functionality as possible, resulting in good coverage.
- Once you complete the initial setup and initialization, the process starts with Instrumentation and profiling. You instrument your app locally on your environment where you can run your app to collect profiling data (metadata about your application). This profiling data will ensure we can automatically identify the code which can be obfuscated and identify safe locations to inject runtime protections without causing instability or performance issues.
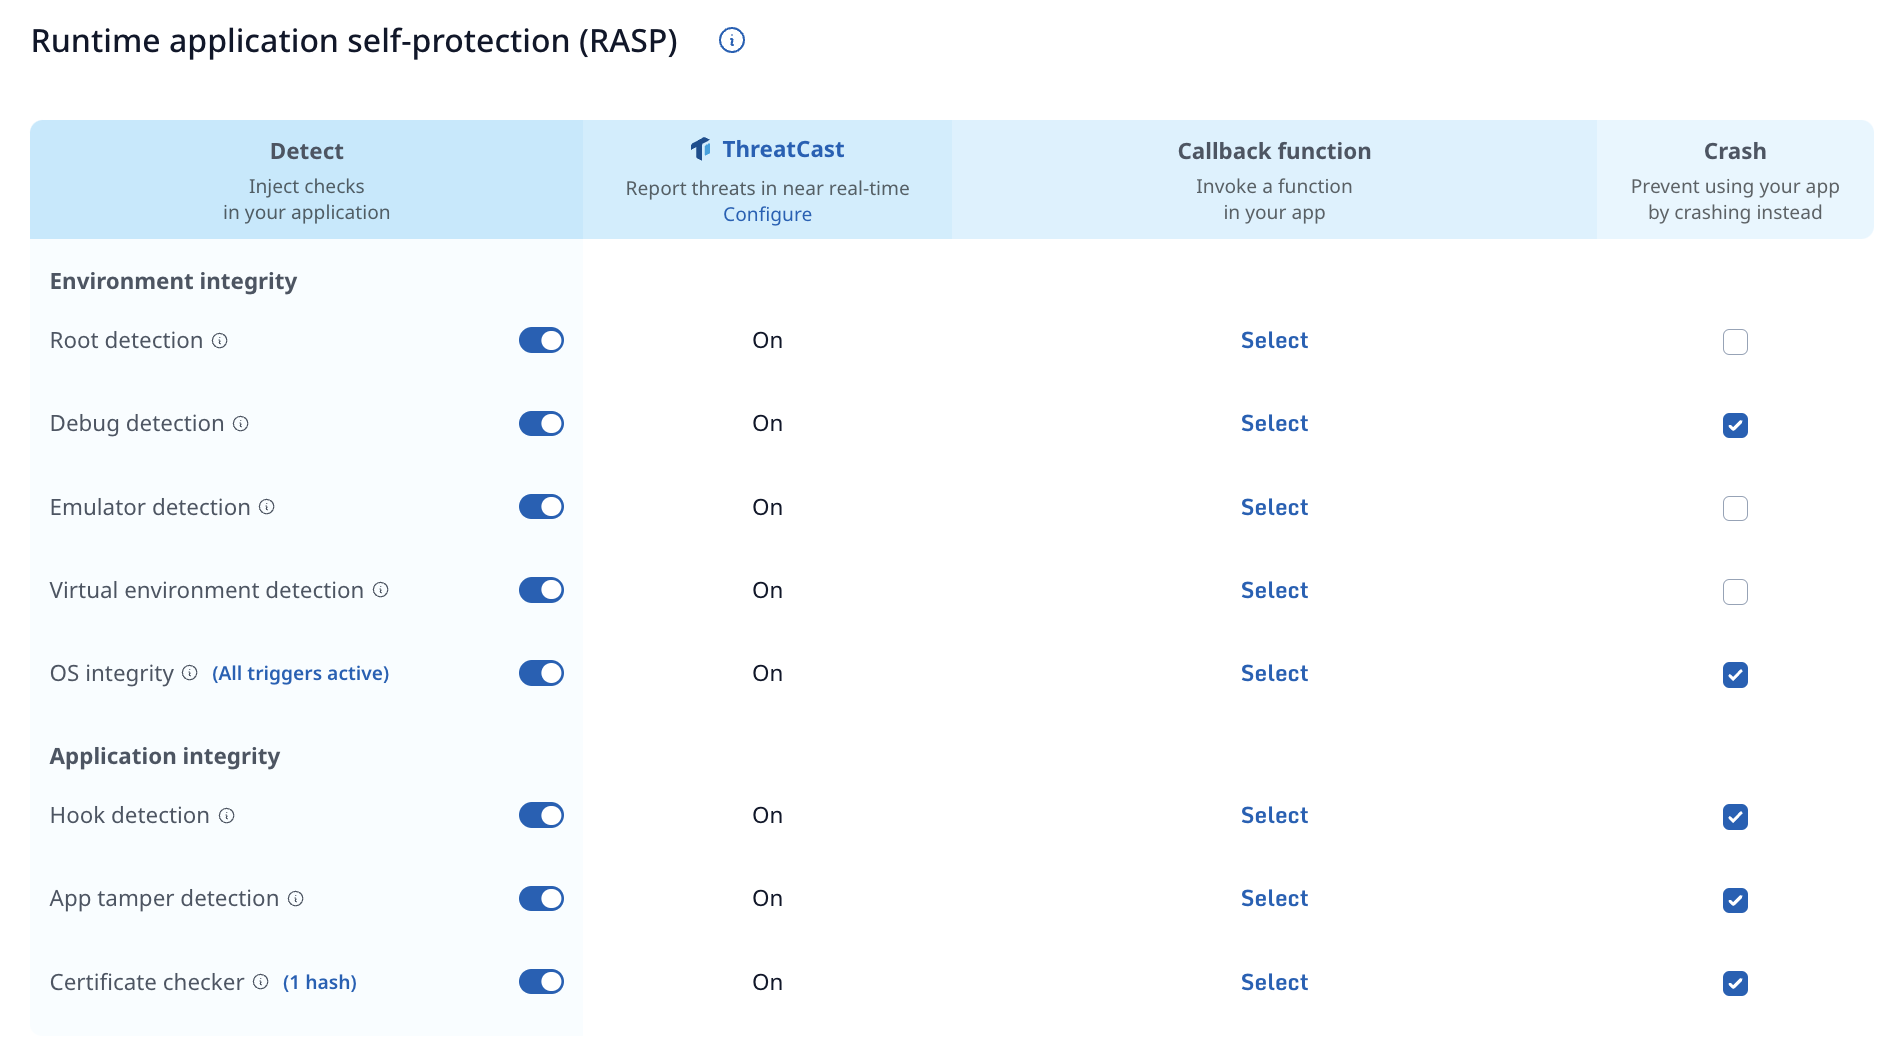
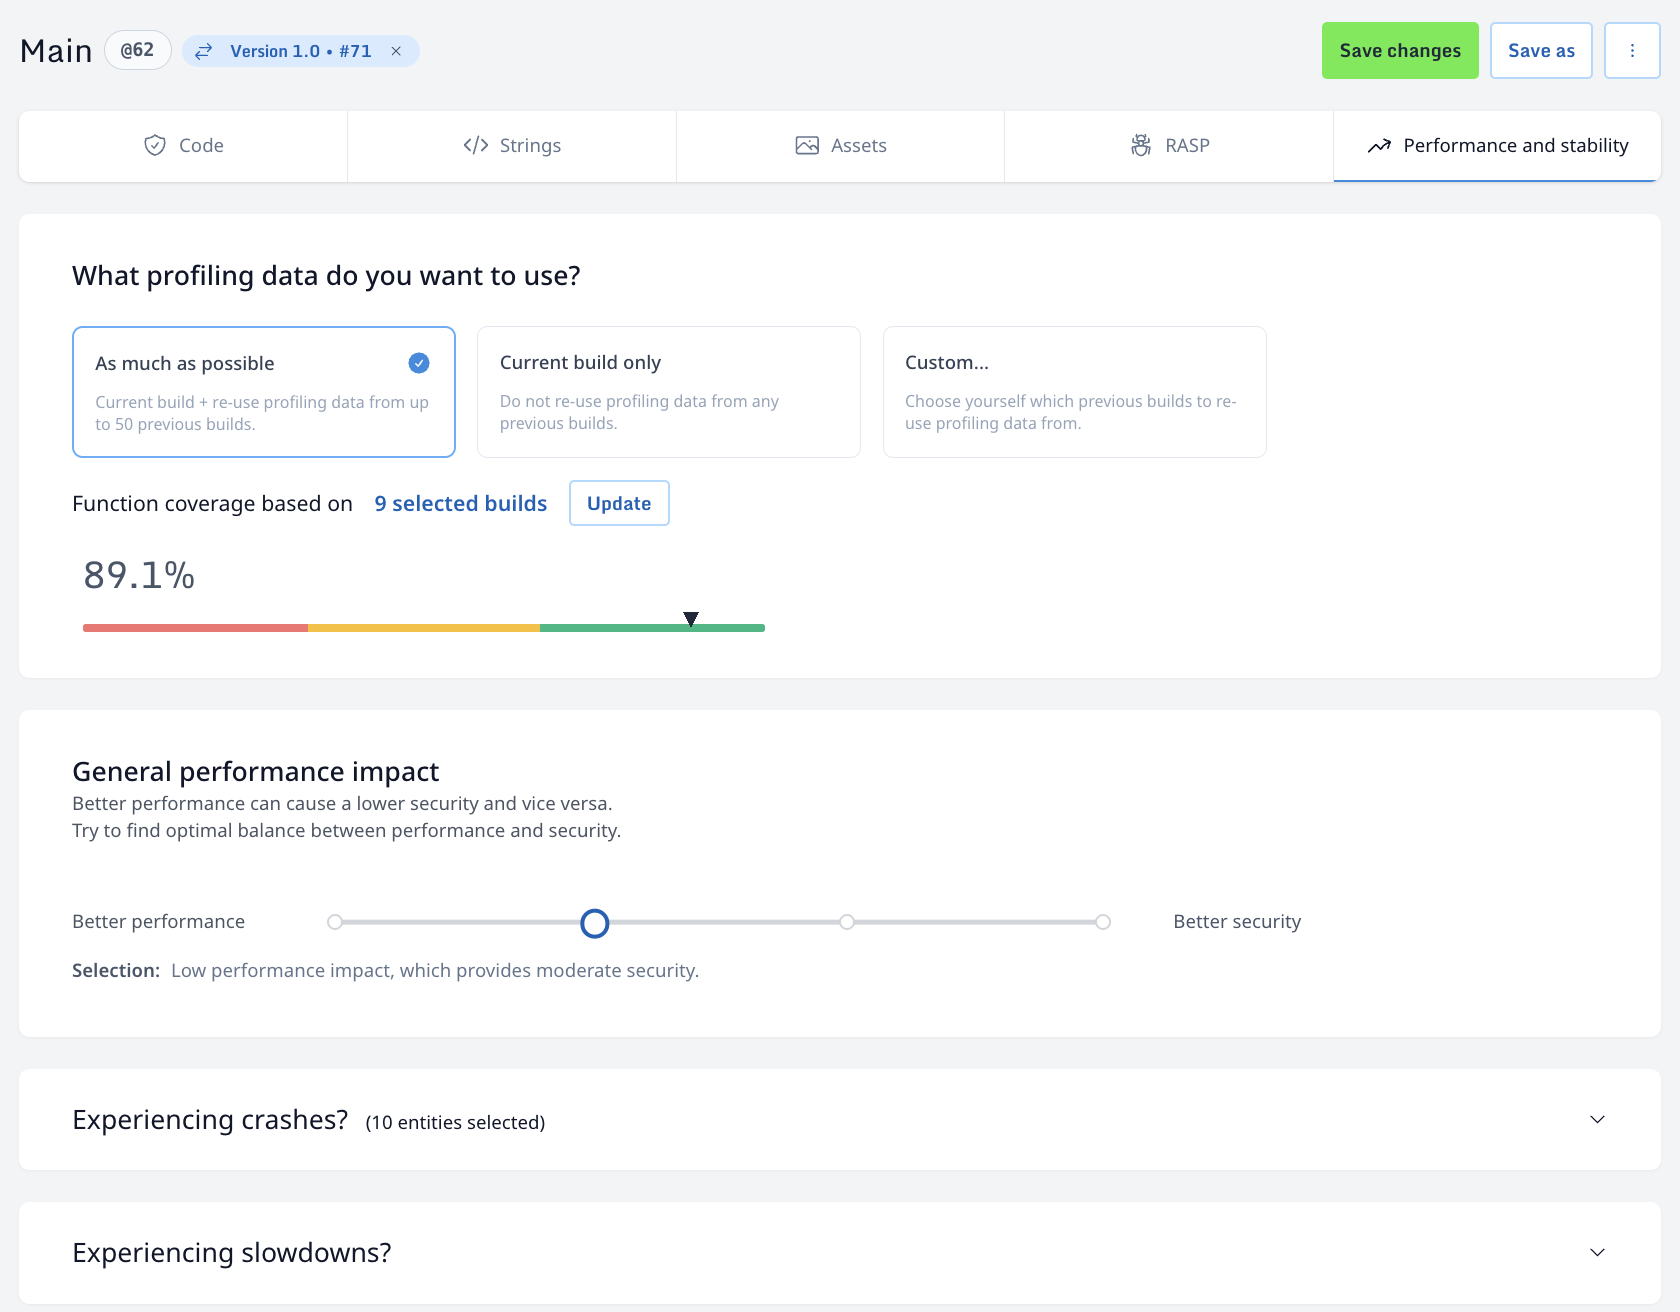
Configure protection: Using simple UI elements you can express which parts of your application are most security sensitive and which security use cases you would like to cover. After you have profiled your application, you can use the Guided Configuration to select the security sensitive aspects of your application and to configure your desired RASP protections and reactions. All of this can be achieved without having to learn a configuration syntax. After completing this step you can run the command to apply this configuration and generate your protected build on your local build machine.
Finally, after a successful build of your protected application, you can view your protection score and the history of any protected builds your team has done to easily track your progress over time. This Collaboration feature gives your team shared access to the protection history and progress.

2. Using ProGuard (Default in Android)
ProGuard comes bundled with Android SDK. If you’re using minifyEnabled in your build.gradle, you’re already using ProGuard:buildTypes {
release {
minifyEnabled true
proguardFiles getDefaultProguardFile(
'proguard-android-optimize.txt'
), 'proguard-rules.pro'
}
}
Customize proguard-rules.pro to avoid stripping important code (like Retrofit models, Room entities, etc.)
3. Integrating DexGuard (Advanced, Paid – for Android)
DexGuard extends ProGuard with Android-specific protections. After purchasing a license:
- Install DexGuard Plugin:
Replace your Gradle plugin with DexGuard’s plugin (from their private repo):buildscript {repositories {
maven {
url 'https://download.guardsquare.com'
}
}dependencies {
classpath 'com.guardsquare:dexguard-gradle-plugin:X.X.X'
}} - Enable DexGuard Features:
apply plugin: 'dexguard'
dexguard {
configurationFiles += file('dexguard-project.pro')} - Advanced Rules: Define enhanced obfuscation, encryption, tamper detection, and RASP settings in
dexguard-project.pro.
4. Integrating iXGuard (Advanced, Paid – for iOS)
iXGuard brings advanced protection to iOS apps, similar to how DexGuard protects Android. It applies obfuscation and runtime hardening to Swift and Objective-C codebases.
- Obtain iXGuard License & CLI:
- After purchasing, download the iXGuard CLI from the Guardsquare platform.
- Install the CLI and authenticate using the same
guardsquare auth loginmethod.
- Prepare Your iOS App (IPA):
- Build a release version of your app (IPA) using Xcode.
- Ensure symbols and bitcode are correctly handled for post-processing.
- Run iXGuard Protection:
guardsquare protect --platform ios --input <your-app.ipa> --output <protected-app.ipa> --config <ixguard-config.json> - Configure Protections: The
ixguard-config.jsondefines:- Which classes/methods to obfuscate
- String encryption
- Runtime checks: debugger detection, jailbreak detection, hook prevention, etc.
- Upload to App Stores or CI/CD: After the protected build is generated, you can upload the
.ipato TestFlight, App Store, or share with your security analysis tools like NowSecure.
After generating protected builds, guardsquare shows a score that reflects your app’s performance and stability.
5. CI/CD Integration (GitHub Actions, Etc..)
Guardsquare tools can be integrated into your CI pipelines:
- ProGuard: Run via
./gradlew assembleRelease. - DexGuard: Add license keys and configuration to environment variables or secrets.
- AppSweep: Add static scans post-build:
Example GitHub Action: (We Can use Pre-Integrated Actions from GitHub Market)
- name: Scan with AppSweep
  uses: guardsquare/appsweep-action@v1
  with:
    api-key: ${{ secrets.APPSWEEP_API_KEY }}
    app-file: app/build/outputs/apk/release/app-release.apk
Alternatively, we can use the GuardSquare CLI to generate instrumented and protected builds.
- Open a terminal.
- Install the GuardSquare CLI by using
curlas instructed in the GuardSquare Documentation.- Ex:
curl -sS <https://platform.guardsquare.com/cli/install.sh> | PRE_RELEASE=1 sh
- Ex:
- After successfully installing the GuardSquare CLI using the above command.
- Authenticate GuardSquare CLI using this command.
- We can either use GuardSquare CLI login/We can Create SSH key & Store Public Key to GuardSquare Portal. In this We are using Guardsquare CLI Login.
guardsquare auth login- This command will provide a link or redirect to a browser for authentication. Since the Some VM lacks a UI interface, copy the link & paste it into the browser on your local machine. Then, log in using GAP SSO to complete the authentication process.


- After a successful login, GuardSquare is configured and ready to create both Instrumented and Protected builds.
How to instrument and profile?
- Instrument:- The command to execute depends on your chosen workflow. In order to produce an instrumented build with Guardsquare CLI, run this command with your unprotected binary:
guardsquare instrument <input-file>Already connect your test device or emulator to the build machine during the instrumentation build process. Once the instrumented build has been created, the CLI will prompt you to install the application on the connected device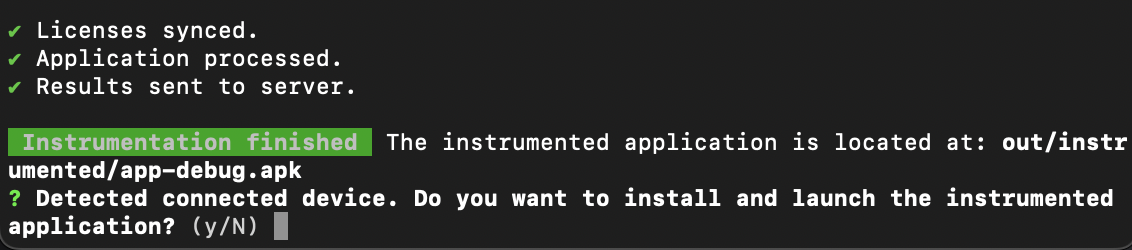 Once the instrumented build has been created, the related page opens automatically in your browser. In a first step, you’re asked to select the first-party code in your application. This selection allows you to be more focused on your own-written code within the dashboard, both during profiling as well as when making security selections within the actual protection configuration of your app. In case you’re making use of Guardsquare plugin, the first-party code selection will already be proposed by Gradle, but you can still revise the selection.
 - Profile:- Below are the steps to manually install the instrumented application on a connected test device.
- Android
- In case you want to install the application manually, you should pass a flag that allows test applications installations.
adb install -t <instrumented-app>- When the instrumented application is launched on the device, it will show up on the profiling page as
connected. - Now you can start navigating around in your app, like any normal user would do.
- iOS
Easiest is to utilize Xcode’sxcrun devicectlcommand that was introduced in Xcode 15. This command allows managing devices from the command line:# if you don't know the device id <udid>, to be used in subsequent commandsxcrun devicectl list devicesÒ# install the instrumented app, <udid> can be the device identifier or the device namexcrun devicectl device install app --device <udid> <instrumented-app># launch the instrumented appxcrun devicectl device launch app --terminate-existing --device <udid> <bundle_id>
- Android
Instrumented/Protected Builds can be shared with Different Platforms.
- Upload Protected IPA to TestFlight & NowSecure.
- name: Upload Protected IPA to TestFlight
run: | LATEST_PROTECTED_IPA=$(ls -td ./out/protected/*.ipa | head -1)
/usr/bin/xcrun altool --type ios --upload-app -f
$LATEST_PROTECTED_IPA -u $AppleAppSpecificUSER
-p $AppleAppSpecificPWDenv: AppleAppSpecificUSER: ${{ secrets.TESTFLIGHT_USERNAME }}
AppleAppSpecificPWD: ${{ secrets.TESTFLIGHT_PWD }}- name: Upload app to NowSecure
uses: nowsecure/nowsecure-action/upload-app@v4
timeout-minutes: 60
with: platform_token: ${{ secrets.IOS_NOWSECURE_TOKEN }}
app_file: ${{ env.LATEST_PROTECTED_IPA }}
group_id: UNIQUE_GROUP_ID - Upload Protected Apk/AAB to NowSecure & Google Play.
- name: Upload apk to NowSecure
uses: nowsecure/nowsecure-action/upload-app@v4
timeout-minutes: 60
with: platform_token: ${{ secrets.ANDROID_NOWSECURE_TOKEN }}
app_file: build/app/guardsquare/out/protected/apk/${{ env.APK_NAME }}
group_id: build/app/guardsquare/out/protected/bundle- name: Upload to Google Play Console
uses: r0adkll/upload-google-play@935ef9c68bb393a8e6116b1575626a7f5be3a7fb
with: serviceAccountJsonPlainText: ${{ secrets.GOOGLE_KEY }}
releaseFiles: "build/app/guardsquare/out/protected/bundle/*.aab"
packageName: UNIQUE_PACKAGE_NAME
track: 'internal'
status: 'draft'
inAppUpdatePriority: 0
🧩 Final Thoughts
Security can no longer be an afterthought in mobile development. With tools like ProGuard, DexGuard, and AppSweep, Guardsquare allows you to bake security directly into your app delivery process—helping you shift security left, reduce risk, and meet compliance demands.
Start with ProGuard for basic obfuscation and shrinking. Then, scale up to DexGuard for enterprise-grade protection and runtime hardening.
Meanwhile, use AppSweep to catch potential security issues early in your CI/CD pipeline.
Integrating these tools into your Android & IOS development lifecycle builds a strong foundation of trust and resilience—ensuring your applications are not only high-performing but also secure by design.
The sooner you treat security as code, the stronger your apps will be—before, during, and after they ship.