
First, let’s address the core challenge
In today’s increasingly digital and remote work environment, having the ability to access office resources from anywhere is crucial. As a professional who often needs to work from home or while traveling, it became necessary for me to securely connect to my office network to access files, applications, and other resources just as if I were in the office. This capability is vital for maintaining productivity and ensuring that work can continue uninterrupted regardless of my physical location.
To address this need, my initial solution was to set up a Virtual Private Network (VPN). A VPN allows for a secure connection over the internet to the office network, effectively creating a private tunnel for data to travel through. This setup promised to provide the security and remote access capabilities I required. VPNs are a common choice for many businesses and individuals because they offer encrypted connections, ensuring that sensitive information remains protected while being transmitted over potentially unsecured networks.
However, I quickly encountered significant challenges with this approach. Setting up a VPN typically requires a static IP address or Dynamic DNS (DDNS) to ensure a consistent connection endpoint.
- Static IP Address: A static IP address is a fixed address assigned to a device by an Internet Service Provider (ISP). This consistency is essential for a VPN to reliably connect to the same address each time a remote connection is initiated. Unfortunately, my office setup did not include a static IP, which meant that the IP address could change periodically, disrupting the VPN connection and making it unreliable.
- Dynamic DNS (DDNS): DDNS is a service that maps internet domain names to IP addresses, updating in real-time to account for changes in dynamic IP addresses. This service can substitute for a static IP address by providing a consistent domain name that always points to the current IP address of the office network. However, my office router did not support DDNS, leaving me without a viable workaround to handle the changing IP addresses.
These limitations rendered the VPN setup ineffective for my needs. The inability to maintain a reliable and consistent connection due to the absence of a static IP or DDNS meant frequent disruptions and an overall poor experience when trying to access office resources remotely. This situation led me to search for alternative solutions that could provide secure remote access without relying on static IP addresses or DDNS.
Introduction to Twingate
Twingate is a pioneering VPN alternative that utilizes a zero-trust model to facilitate business traffic and proxy access. It offers multiple layers of secured access, user-identity authentication, SSO, 2FA, encryption, and kill switches to protect against geo-blocks and port-access errors. Its granular access and customer support make it stand out among other VPN alternatives.
Compatible with all major platforms, controllers, relays, and resources, Twingate grants granular permissions for authentication and SSO methods through an invisible gateway. It employs SSL/TLS and AES-256 encryption with symmetrical keys and split tunneling to separate personal traffic. Furthermore, it promises a strict privacy policy, even in countries like China and the 5 Eyes Alliance.
With unlimited users and device connections, Twingate caters to both individuals and enterprises. Try it for free and experience the seamless installation and pricing options. Say goodbye to traditional VPNs and welcome the future of network resources with Twingate, the VPN killer and zero-trust network access provider.
Zero-Trust Network with Tight Security
A network built on trust with limited security can be an entryway for cyber-attacks. To combat it, a zero-trust network access approach with heightened tight security protocol is essential. This system believes that no entity should be trusted, including those within the network perimeter. Instead, every user request must be thoroughly authenticated and authorized before being granted access.
Incorporating two-factor authentication, encryption of data in transit and at rest, monitoring user behavior analytics (UBA), and segmentation are the primary measures required to set up zero-trust networks with tight security protocols. These actions help limit lateral movement across the network by segregating users and resources by workload needs, ensuring the least privilege access policies.
Furthermore, always keep your digital perimeter secure by configuring firewalls to enforce a policy of default-deny access as well as scanning devices for vulnerabilities periodically.
It’s imperative to note that employing these measures for a robust zero-trust network access protocol requires considerable investments in terms of money and time. Nevertheless, it guarantees improved security preventing identity theft breaches, reducing risk exposure, and internal threats as well as guaranteeing compliance with regulations like GDPR or HIPAA.
How Twingate Works
Twingate was designed from the beginning with a thoughtful approach to security in mind. A key feature of Twingate’s design is that no single component can independently make a decision to allow traffic to flow to another component or Resource in your Remote networks. Authorization for user access or data flow is always confirmed with a second — or even with a third — component depending on the sensitivity of the decision being authorized. By adding in a delegation of user authentication to a third-party Identity Provider (IdP), that separation of concerns extends even further, providing an additional layer of security to your Twingate network.
The following guide starts by covering Twingate’s architecture and then dives into how Twingate encrypts traffic and guarantees that users can only securely access Resources they have been authorized to access.
Twingate relies on four components — the Controller, Clients, Connectors, and Relays — that together ensure that only authenticated users can access the Resources that they have been authorized to access.

- Controller: Central component that manages configuration, user authentication, and access control lists (ACLs). It delegates user authentication to third-party identity providers.
- Client: Software installed on user devices that handles authentication, network routing, and authorization decisions. It establishes encrypted tunnels for secure access.
- Connector: Deployed behind the firewall in the private network, it authenticates with the Controller and maintains connections with Relays. It verifies incoming connections and performs local DNS resolution.
- Relay: Acts as a registration point for Connectors and connects Clients to Connectors. It ensures low latency by attempting peer-to-peer connections.
Setting Up Twingate
Setting up Twingate for secure remote access is straightforward. Here’s a detailed guide based on my experience:
Step 1: Create a Twingate Network for Your Organization
- Sign-In Method: Start by creating a Twingate network for your organization. When prompted to choose a sign-in method, I opted for Google Single Sign-On (SSO). This simplifies the login process by leveraging your existing Google account credentials for secure access.
Step 2: Choose Your Plan
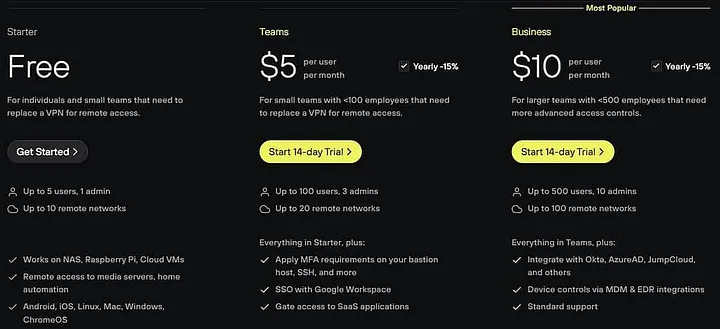
- Plan Selection: Next, choose a Twingate plan that suits your needs. For my setup, I selected the free plan, which offers essential features suitable for small-scale or initial deployments.
Step 3: Create Your Network

- Network Creation: After selecting your plan, proceed to create your network on Twingate. You will need to choose a location for setting up the Twingate Connector. I chose an on-premises location, meaning I planned to install the Connector on a server within my office network.
Step 4: Create and Configure the Connector
- Connector Setup: Create a Connector and select the operating system that matches your server. I chose Linux for my setup.
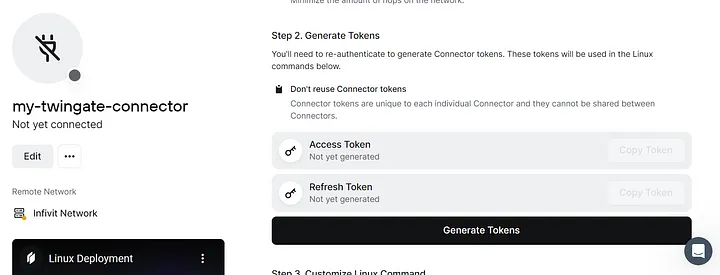
- Generate Token: Click on “Generate Token” to get the access token required for the Connector installation. This token is a secure identifier used during the installation process to link the Connector to your Twingate network.
Step 5: Install the Connector
- Installation Command: After generating the Connector, Twingate provides a Linux command for installation. Copy this command.

- Run the Command: Run the command on your chosen Linux server. This will install the Connector software. Once installed, you will be redirected to the Twingate network page, where you can check the status of your network. If everything is set up correctly, the status should be green, indicating the Connector is successfully installed and operational.
Step 6: Add Resources to Your Network


- Resource Addition: With the Connector up and running, the next step is to add the resources you want to access remotely. I added two virtual machine (VM) resources to my Twingate network, as I needed to SSH into these machines from outside my office network.
Final Step: Access Your Resources
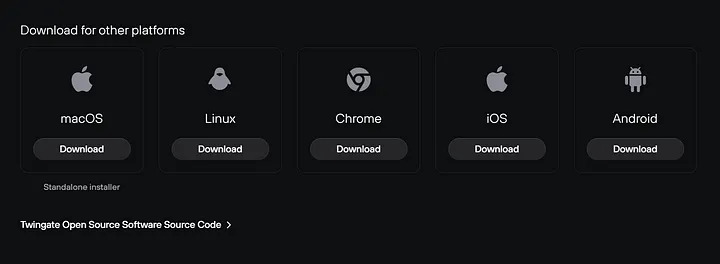
- Install Twingate Client: To access the resources, you need to install the Twingate Client on your device. The client application is available for various platforms.
https://www.twingate.com/download
- Sign In: Once installed, open the Twingate Client and sign in using your Google account (or the account linked during setup).
- Access Resources: After successful sign-in, you can use the Twingate Client to establish a secure connection. In my case, I was able to SSH into the two VM resources on my network seamlessly, as if I were directly connected to the office network.
Summary
Setting up Twingate involves creating a network, configuring a Connector, and adding resources you wish to access remotely. This process eliminates the need for a static IP or DDNS, offering a secure, reliable, and straightforward solution for remote access. With Twingate, you can ensure seamless connectivity and enhanced security for accessing your office resources from anywhere.